How To Heat Mold Ski Boots: Quick Boot Fitting Tips
Heat mold ski boots by warming the liners and shells briefly for a custom, comfortable fit.
I’ve spent years fitting boots for friends and myself, so I know what works and what doesn’t. This guide explains how to heat mold ski boots safely and effectively, whether you’re using a pro’s oven, an in-shop service, or doing a careful at-home liner-only mold. You’ll get clear steps, safety tips, tools to use, common mistakes to avoid, and real-world advice so your boots fit like they were made for your feet.
Why heat mold ski boots?
Heat molding customizes the shape of the boot to match your foot. This reduces pressure points, improves control, and increases comfort on long days. When liners and thermoformable shells are warmed, the materials become pliable. They then conform to your foot and harden as they cool.
How to heat mold ski boots is a key skill for skiers who want better performance without buying a new pair every season. A good mold can stop hotspots and help you ski longer without pain.

Understanding boot anatomy and materials
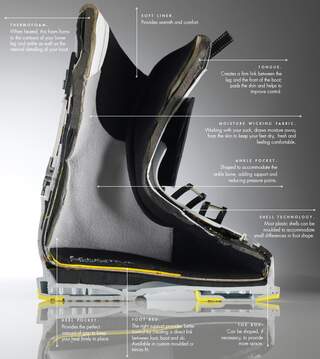
A quick grasp of parts helps when learning how to heat mold ski boots.
- Shell
- The hard outer plastic that gives structure and power transfer.
- Liner
- The soft, often foam-based inner piece that provides comfort.
- Footbed and ankle pads
- Smaller inserts that also shape the fit.
Thermoformable liners are the easiest to mold at home. Some shells are also heat-moldable but require precise ovens and trained hands. Not all plastics respond the same way, so check the manufacturer’s instructions before attempting any molding.

When should you heat mold ski boots?
Heat molding is appropriate when you notice:
- New pressure points despite correct sizing.
- Hands-off fit that causes ankle slop.
- Liner compression from long use.
- New boots that are stiff but labeled as “heat-formable.”
Avoid molding if your boots are very old, cracked, or have non-thermo plastics. When in doubt, consult a bootfitter or the boot maker’s instructions. Knowing when to heat mold ski boots prevents damage and gives the best results.

Tools and equipment you’ll need
Using the right tools keeps the process safe and effective.
- Professional boot oven (preferred for shells and full molds).
- Home oven or dedicated boot heater for liner-only molding.
- Heat gun (only for targeted, small areas and with caution).
- Thermal thermometer to verify temperatures.
- Gloves and towels for handling hot liners.
- Boot trees or formers to hold shape while cooling.
If you don’t have a professional oven, focus on liner-only molding at home. Trying to oven-mold shells without experience can warp or ruin the boot.

Step-by-step: Professional oven method (shell + liner)
This is the standard shop method and gives the best, most even results when how to heat mold ski boots properly.
- Inspect boots
- Remove insoles and check for damage. Confirm the boot is heat-moldable by maker’s guidance.
- Preheat the oven
- Set between 80–100°C (175–210°F) as per manufacturer. Monitor with a thermometer.
- Prepare the liner and shell
- Loosen buckles and open cuff straps. Place a towel inside the shell to prevent suction.
- Heat evenly
- Heat boots for 8–12 minutes until liners feel soft to touch but not hot.
- Don the boots
- With gloves, put liners into the shell and then put the boots on. Stand in a natural skiing stance.
- Cool while wearing
– Keep buckles closed lightly and stand for 20–30 minutes until cooled and set. - Final adjustments
- Add orthotics or footbeds, check fit, and make micro adjustments.
Professional equipment and training reduce risk of overheating. Shops will also trim liners and adjust shell windows if needed.
Step-by-step: At-home liner-only method
This safe at-home method focuses on molding liners without heating shells. It’s what I use for quick fixes.
- Remove liners
- Take liners out and remove insoles.
- Heat liners
- Use a home oven at low heat (no higher than 70–80°C / 160–175°F) for about 6–8 minutes. Watch carefully.
- Put liners on
- Wear thin ski socks. Slide liners on and then your footbeds. Buckle gently.
- Cool down
- Stand for 20–30 minutes to let liners set around your foot.
- Reinstall liners
- Put liners back in shells. Test fit on snow or with boot flexes.
Never use a home oven to heat the whole shell unless manufacturer allows it. Heat only the liners to reduce risk.

Heating shells safely and what to avoid
Shell molding can dramatically change fit but carries more risk.
- Only heat shells if:
- The manufacturer states they are thermoformable.
- You use a pro boot oven or a trained bootfitter.
- Avoid:
- Open-flame or improvised ovens.
- Overheating above recommended temps.
- Using a heat gun on large shell areas.
If a shell warps, fix options are limited. That’s why many skiers and fitters prefer liner-only molding for regular adjustments.

Aftercare and making adjustments
Good aftercare keeps your custom fit lasting longer.
- Test on snow within a day to confirm fit under real conditions.
- Use footbeds or orthotics to fine-tune arch support.
- If small pressure points persist, try localized punching or foam pads.
- Re-mold liners again after grinding out significant pressure points, but allow at least 24–48 hours between full molds.
Keep a log of what you changed. I note temperatures and time so future adjustments are easier.

Common mistakes and troubleshooting
I’ve seen a few repeat errors. Learn from them.
- Mistake: Overheating liners.
- Result: Loss of support and crushed foam. Always stick to recommended temps.
- Mistake: Wearing thick socks during mold.
- Result: False shape; liner will be loose with thinner socks. Use the socks you plan to ski in.
- Mistake: Trying to fix shell problems with liners only.
- Result: Limited change. Shell shaping needs shell work.
- Troubleshoot hotspots by pinpointing the area and using localized remolding or padding.
These lessons saved me time and a few ruined pairs.
My personal tips and lessons learned
I heat molded my first pair in a bathtub-sized panic and learned the right way through mistakes.
- Always start with the liner-only method if you’re unsure.
- Keep temp logs for each boot brand. Different liners react differently.
- Use a bootfitter for complex issues like heel lift or major shell pressure points.
- Expect a small break-in after molding; liners compress slightly over a few days.
The biggest lesson: patience. Rushing the process can make boots worse.
How long does molding last and when to remold?
A proper mold can last a season or more. Liners compress over time. Remold when:
- You feel new pressure points.
- You gained or lost significant weight or muscle mass.
- You’re switching footbeds or orthotics.
If you maintain liners and rotate boots, the fit remains better longer. Knowing how to heat mold ski boots helps you decide when a remold is necessary.
Safety checklist before you start
- Confirm boots are heat-moldable.
- Use a thermometer and follow temps.
- Wear protective gloves.
- Don’t leave heating equipment unattended.
- If unsure, take boots to a professional.
Safety prevents costly mistakes and injuries.
Frequently Asked Questions of how to heat mold ski boots
What is the difference between liner-only and full-shell molding?
Liner-only molding warms just the soft liner to form around your foot. Full-shell molding heats both the liner and the plastic shell for a deeper, structural change. Liner-only is safer at home; shell molding is best done by a pro.
Can I heat mold ski boots at home safely?
Yes, but limit yourself to liner-only molding and use low, monitored temperatures. Avoid heating whole shells unless the manufacturer allows it and you have proper equipment.
How hot should I heat the liners?
Aim for about 70–80°C (160–175°F) for liners, unless the boot maker specifies otherwise. Use a thermometer and never exceed recommended temps.
Will heat molding prevent foot pain completely?
Heat molding reduces pressure points and improves fit, but it won’t fix biomechanical issues. Orthotics or further custom work may still be needed.
How soon can I ski after molding?
Wait until liners and shells fully cool—typically 20–30 minutes standing during molding, and test on short runs that day. Small adjustments can be done after a first ski.
Conclusion
You can greatly improve comfort and performance when you learn how to heat mold ski boots the right way. Start with liner-only molding at home, use professional help for shell work, follow temperature guidelines, and take a patient, careful approach. Try a small test mold, keep notes, and adjust gradually. If you’re ready to upgrade boot fit, schedule a shop visit or try the liner method this weekend and feel the difference.
Take action: test one liner-only mold, note the results, and share your experience or questions below — your next day on the hill could be your most comfortable yet.

Michael Smith is the Content Strategist behind The Style Hub, where fashion meets function. With a keen eye for trends and a passion for everyday style, he curates content that helps readers make smarter, more stylish choices—from the perfect pair of sneakers to must-have accessories. Michael specializes in breaking down fashion into practical, wearable insights, making style accessible for everyone. When he’s not researching the latest trends, he’s exploring how comfort, innovation, and timeless design come together in modern fashion.